Tuesday, November 30, 2010

How to Convert Audiobook to MP3

An audiobook is a recording that is primarily spoken word. It is often based on a recording of commercial printed material. It is not necessarily an exact audio version of a book. Audiobooks are distributed on CDs, cassette tapes, downloadable digital formats (e.g., MP3 (.mp3), Windows Media Audio (.wma), and Advanced Audio Coding (.aac). A benefit to the CD format is that CDs can be ripped and then put onto an MP3 player; a 14 CD "book" can be put onto a tiny cheap MP3 player.
Want to enjoy your favorite audible audiobook in the gym or performing mundane tasks around the house or at work? AVCLabs Audiobook Converter makes it convenient to enjoy your favorite audiobooks purchased or rented from Audible, Simply Audiobooks, Audiobooks, Audio To Go, Kitabe.com, Audio Books Corner, AudioQueue, Recorded Books, LibriVox, and more audiobook service provider.

How to Convert Audiobook to MP3 with AVCLabs Audiobook Converter?

AVCLabs Audiobook Converter is an all-in-one AA Converter that can convert any audio books which could be played on iTunes. The conversion is 5X speed fast, and output could be CD Quality. It converts any purchased Audiobooks from iTunes or Audible on MAC OS X to MP3 or AAC files. Besides, it supports batch conversion. You can batch convert DRM protected or unprotected audio books to unprotected MP3 or AAC files with ID tags preserved and chapters kept after conversion.
Here the following is a brief guide on how to convert audiobook to mp3 with AVCLabs Audiobook Converter:

Step 1: Download and Install AVCLabs Audiobook Converter

Click the Download button below to download and install AVCLabs Audiobook Converter. There is 1 minutes limitation on the output videos in free trial version. If you feel satisfied with the performance of AVCLabs Audiobook Converter, please click the Buy now button to buy a lifetime license to unlock the time limitation.
Free Download AVCLabs Audiobook Converter  Buy AVCLabs Audiobook Converter
Free download AVCLabs M4V Converter Plus or buy a license at $34.95

Step 2: Select Audible Audiobook to Convert

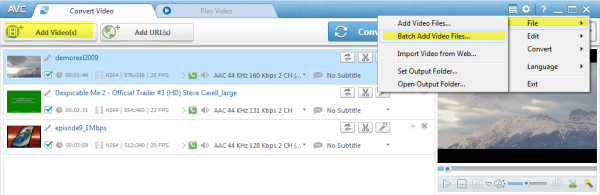
Click Add button, all the audiobook in your iTunes Library of Audio Book will be listed. You could select some of audiobooks, or search audiobooks according the information such as All, Artist, Album, Composer, Song in the Search box, then select your desired audiobooks,click "OK".
Add audiobooks

Step 3: Set Preferences of AVCLabs Audiobook Converter

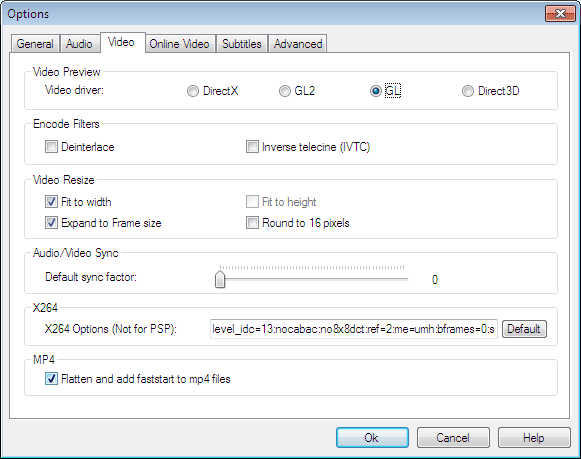
You may set the preference of your output files, by click menu "Audio Book Converter -> Preferences...".
set preference
Save output files to: You can save the output files to default document audiobooks, and choose Custom to browse the location as you like.
Cover existing file after converting: Check it, when you convert an audiobook file once again, the new converted file will convert the existing converted file, please be cautious.
Remove original file after split: Check it, you will lose the source audiobook after splitting, but before converted it is exist, please be cautious.
Automatically check update on startup: Check it, you will automatically check update on startup every time, please choose it as like.

Step 4. Start Converting audible audiobook to MP3

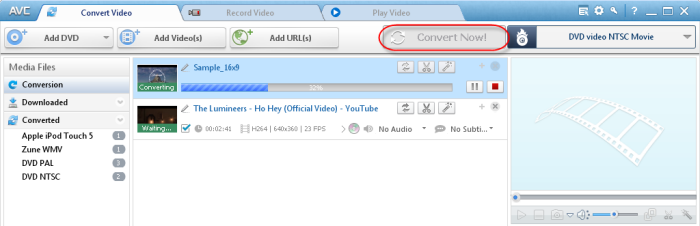
Make sure the audible audiobooks in the file list, then press Convert button or click the menu Control->Start Converting. If you want stop converting, please click Stop.
Start conversion

Step 5. Split audible audiobook file into chapters

1) Set the Split settings in Preferences as you desired.
2) Select audible in the file list, press Split button and then enter split interval, audible will be split to your desired several parts.
split audiobook

How to Burn iTunes DRM M4V Video to DVD

Users are restricted to play iTunes purchased M4V video on only 5 devices which are basically Apple devices including iPod Classic, iPod Nano, iPod Touch, iPhone, Apple TV and iPad. If you want to play your iTunes DRM video on non-Apple devices, such as on your TV system, you must bypass the DRM protection and then burn the unprotected m4v file to DVD. Well, with AVCLabs M4V Converter, you can easily remove DRM protection from iTunes purchased videos such music video, movie, and TV shows. After you have removed DRM protection, you can use Any DVD Converter, you can also easily burn m4v video to DVD or Blu-ray disc.
Here the following is a brief introduction on how to burn iTunes DRM m4v video to DVD:

Part 1: Remove DRM Protection from iTunes M4V Videos

AVCLabs M4V Converter is an ideal iTunes DRM video converter. It's capable of removing Apple's FairPlay DRM copyright protection from iTunes M4V files and converting the m4v files to popular formats like MOV, AVI, MPG, FLV, 3GP, 3G2, MPEG-I, MPEG-II, and MP4, so that you can play the purchased m4v files without authorizing your computer.
Please download and install AVCLabs M4V Converter , and then simple follow the steps to unprotect iTunes DRM TV episodes, movies, and music videos.

Step 1: Download and Install AVCLabs M4V Converter

Click the Download button below to download and install AVCLabs M4V Converter. There is 1 minutes limitation on the output videos in free trial version. If you feel satisfied with the performance of AVCLabs M4V Converter, please click the Buy Now button to buy a lifetime license to unlock the time limitation.
Free Download AVCLabs M4V Converter Buy AVCLabs M4V Converter
Free download AVCLabs M4V Converter or buy a license at $39.95

Step 2: Add M4V Videos to AVCLabs M4V Converter

Click Add button, and you will be prompted a window to choose M4V files. Select Movies, and the m4v files in your iTunes movie library will be displayed in the list. Choose the file you want to convert, and click OK.
Add M4V files

Step 3: Set output path and output format

This software can convert iTunes M4V files to various video formats such as MOV, MPEG-4, AVI, FLV, SWF, 3GP, 3G2, MP3G-1, MPEG-2. Click the Output Format drop down list to select your desired format. Click Output Path to specify a folder which has sufficient space to save the converted file.
M4V Converter output format

Step 4. Click "Convert" button to start converting iTunes DRM videos to selected video format.

Click Convert button to start convert iTunes DRM M4V files to the selected format. Wait for a while, then you enjoy your purchased iTunes movies on any portable players on the go!
Tips: Before hitting the Convert button, you can customize the output settings such as video codec, video size, video bitrate, video framerate, audio codec, audio bitrate, and audio channel in order to meet specific needs.

Part 2: Burn the Unprotected iTunes M4V Video to DVD

Step 1: Download and Install AVCLabs Any DVD Converter

Click the Download button below to download and install AVCLabs Any DVD Converter. There is 3 minutes limitation on the output videos in free trial version. If you feel satisfied with the performance of AVCLabs Any DVD Converter, please click the Buy Now button to buy a lifetime license to unlock the time limitation.
Free Download AVCLabs Any DVD Converter Buy AVCLabs Any DVD Converter
Free download AVCLabs Any DVD Converter or buy a license at $45.95

Step 2: Add iTunes M4V Videos to the program and then choose Burning to DVD output profile

Click Add Video button or go to menu File > Add Video Files to select the unprotected iTunes m4v video. Then please unfold Output Profile, choose Burning to DVD from the list, and then choose DVD video NTSC Movie or DVD video PAL Movie according to your TV system.
DVD format

Step 3 : Start encoding iTunes m4v video and then choose DVD Menu

Once everything is ready, you can click on Convert to start to convert unprotected iTunes m4v video. You will be prompted to choose DVD Menu when the program finishes video conversion process.
DVD Menu
With DVD Menu, You can customize your CD/DVD as you like. Such as name your CD/DVD in DVD Menu Tile, browse music file from your local computer for your DVD in Background Music,change your DVD's background image in Background Image and etc.

Step 4 : Insert DVD and start burning iTunes m4v video to DVD

Note: If the inserted disc is not empty, you will be prompted to erase the disc. Click Yes, all data on the disc will be overwritten! After the program finish to burn video to DVD, it will pop up a DVD Burning Engine to congratulate you that your disc has been successfully burned. Click OK button, the drive automatically ejects the disc.
Now you can enjoy your iTunes M4V files on your TV freely!

For more detail information, you can view the following website:http://www.avclabs.com/

Monday, November 22, 2010

How to Burn Metacafe Videos to DVD/Blu-ray disc

Metacafe is a community based video sharing web site, that specializes in short-form original entertainment, where users upload, view and share video clips. The site features short-form videos in a variety of categories, including Animation, Comedy, Entertainment, How To, News and Events, People and Stories, Sports, Video Games and others. Original content is uploaded to the site by independent video creators, small to mid-sized production groups, and major media companies. In you prefer enljoy Metacafe Videos on TV system to online-watching, you can burn Metacafe videos to DVD or Blu-ray disc. But how to burn the funning Metacafe videos to DVD or blu-ray disc? Here our programs can help you burn your desired Metacafe videos to DVD.
Any Video Converter and Any DVD Converter Professional feature a new characteristic: both of them can burn Metacafe video to DVD with DVD Menu.
Here the following is a brief guide on how to burn Metacafe video to DVD/Blu-ray disc.

Step 1 : Add/Download Metacafe video to the program.
If you have downloaded the Metacafe Videos from the website and saved in your computer disc, you just need click Add Video button or go to menu File > Add Video Files to select your desired video clips from your hard drive. But if you do not download the Metacafe Videos, with Any Video/DVD Converter, you can download videos from Internet and then burn it to Blu-ray disc.
Firstly, you need to visit Metacafe.com and right-click on the desired video to choose Copy Link Location (this is for Firefox users) or open the video and then copy the URL from the navigation bar (this is for IE users).
Secondly, you can click online video download button to begin download Metacafe directly.
Download button
Or you can choose File> Import Video to from Internet to begin downloading videos.
Burn Metacafe Videos to DVD
Thirdly, paste the link in the program

Download Metacafe Videos
After you have downloaded the Metacafe Videos, all of them will be displayed on the middle panel with their detailed information, including duration, format and size, etc.

Step 2 : Choose Burning to DVD output profile.
Please unfold Output Profile, choose Burning to DVD from the list, and then choose DVD video NTSC Movie or DVD video PAL Movie according to your TV system.
Choose output formats

Step 3 : Click Convert button to start encoding Metacafe Videos.
Once everything is ready, you can click on Convert to start the exporting process. If you would like to cancel encoding, please just click the Stop button and click Yes in the pop-up window then the encoding will be stopped.

Step 4 : Choose DVD Menu.
You will be prompted to choose DVD Menu when the program finishes Metacafe video conversion process.
DVD Menu
--In DVD Menu Tile, you can name your DVD and input it into the box directly.
--In Background Music, you can browse music file from your local computer for your DVD.
--In Background Image, you can change your DVD's background image by click Browse Image File to select your desired image from your computer.
--In Menu Navigator, you can choose the playback mode for your DVD.
After you have made sure the settings, please click Next>> to follow the next step.

Step 5 : Insert DVD and start burning Metacafe video to DVD
In DVD Configuration, you can see the following pop-up window;
DVD configuration
The program supports burning video to CD-R, CD-RW, DVD-RAM, DVD+R, DVD+RW, DVD+R Dual Layer, DVD-R, DVD-RW, DVD-R Dual Layer, random access writes, Blu-ray media, Blu-ray Rewritable media.
Insert a DVD media to the DVD burner, select recorder from the drop-down list, enter your desired Disc Lable, and then click Burn button, then the program will begin to burn video to DVD.
Note: If the inserted disc is not empty, you will be prompted to erase the disc. Click Yes, all data on the disc will be overwritten!
DVD burning engine
You can see the progress of burning Metacafe video to disc:
Burn DVD status
After the program finish to burn Metacafe video to DVD, it will pop up a DVD Burning Engine to congratulate you that your disc has been successfully burned.
Click OK button, the drive automatically ejects the disc.
Burn Metacafe Videos to DVD successfully
Now your Metacafe video have been burned successfully to DVD/Blu-ray disc, just have fun!
 

How to Burn Nico Videos to DVD/Blu-ray disc

Nico Video is a popular video sharing website in Japan managed by Niwango. In this webiste users can upload, share, and view videos. Unlike other video sharing sites, however, comments are overlaid directly onto the video, synced to a specific playback time. This allows comments to respond directly to events occurring in the video, in sync with the viewer - creating a sense of a shared watching experience. Maybe some people prefer enjoy Nico Videos on TV system. So they need to burn Nico Videos to DVD or Blu-ray disc. But how to burn the funning Nico Videos to DVD or blu-ray disc? Here our programs can help you burn your desired Nico Videos to DVD.
Any Video Converter and Any DVD Converter Professional feature a new characteristic: both of them can burn Nico video to DVD with DVD Menu.
Here the following is a brief guide on how to burn Nico video to DVD/Blu-ray disc.

Step 1 : Add/Download Nico video to the program.
If you have downloaded the Nico Videos from the website and saved in your computer disc, you just need click Add Video button or go to menu File > Add Video Files to select your desired video clips from your hard drive. But if you do not download the Nico Videos, with Any Video/DVD Converter, you can download videos from Internet and then burn it to Blu-ray disc.
Firstly, you need to visit Nico.com and right-click on the desired video to choose Copy Link Location (this is for Firefox users) or open the video and then copy the URL from the navigation bar (this is for IE users).
Secondly, you can click online video download button to begin download Nico directly.
Download button
Or you can choose File> Import Video to from Internet to begin downloading videos.
Burn Nico Videos to DVD
Thirdly, paste the link in the program

Download Nico Videos
After you have downloaded the Nico Videos, all of them will be displayed on the middle panel with their detailed information, including duration, format and size, etc.

Step 2 : Choose Burning to DVD output profile.
Please unfold Output Profile, choose Burning to DVD from the list, and then choose DVD video NTSC Movie or DVD video PAL Movie according to your TV system.
Choose output formats

Step 3 : Click Convert button to start encoding Nico Videos.
Once everything is ready, you can click on Convert to start the exporting process. If you would like to cancel encoding, please just click the Stop button and click Yes in the pop-up window then the encoding will be stopped.

Step 4 : Choose DVD Menu.
You will be prompted to choose DVD Menu when the program finishes Nico video conversion process.
DVD Menu
--In DVD Menu Tile, you can name your DVD and input it into the box directly.
--In Background Music, you can browse music file from your local computer for your DVD.
--In Background Image, you can change your DVD's background image by click Browse Image File to select your desired image from your computer.
--In Menu Navigator, you can choose the playback mode for your DVD.
After you have made sure the settings, please click Next>> to follow the next step.

Step 5 : Insert DVD and start burning Nico video to DVD
In DVD Configuration, you can see the following pop-up window;
DVD configuration
The program supports burning video to CD-R, CD-RW, DVD-RAM, DVD+R, DVD+RW, DVD+R Dual Layer, DVD-R, DVD-RW, DVD-R Dual Layer, random access writes, Blu-ray media, Blu-ray Rewritable media.
Insert a DVD media to the DVD burner, select recorder from the drop-down list, enter your desired Disc Lable, and then click Burn button, then the program will begin to burn video to DVD.
Note: If the inserted disc is not empty, you will be prompted to erase the disc. Click Yes, all data on the disc will be overwritten!
DVD burning engine
You can see the progress of burning Nico video to disc:
Burn DVD status
After the program finish to burn Nico video to DVD, it will pop up a DVD Burning Engine to congratulate you that your disc has been successfully burned.
Click OK button, the drive automatically ejects the disc.
Burn Nico Videos to DVD successfully
Now your Nico video have been burned successfully to DVD/Blu-ray disc, just have fun!

Related Articles:
How to Burn YouTube Video to DVD
How to Burn Google Video to DVD
How to Burn Metacafe Video to DVD

If you want to learn more information about this program, you can view the following website:
http://www.any-video-converter.com/

How to Burn Google Videos to DVD/Blu-ray disc

Google Video is a free video sharing website and also a video search engine from Google Inc. Google Videos allows selected videos to be remotely embedded on other websites and provides the necessary HTML code alongside the media, similar to YouTube. If you want to enjoy Google videos on TV system rather than online wathing, you need to burn Google videos to DVD or Blu-ray disc. But how to burn the funning Google videos to DVD or blu-ray disc? Here our programs can help you burn your desired Google videos to DVD.
Any Video Converter and Any DVD Converter Professional feature a new characteristic: both of them can burn Google Video to DVD with DVD Menu.
Here the following is a brief guide on how to burn Google video to DVD/Blu-ray disc.

Step 1 : Add/Download Google video to the program.
If you have downloaded the Google videos from the website and saved in your computer disc, you just need click Add Video button or go to menu File > Add Video Files to select your desired video clips from your hard drive. But if you do not download the Google Videos, with Any Video/DVD Converter, you can download videos from Internet and then burn it to Blu-ray disc.
Firstly, you need to visit Google.com and right-click on the desired video to choose Copy Link Location (this is for Firefox users) or open the video and then copy the URL from the navigation bar (this is for IE users).
Secondly, you can click online video download button to begin download Google directly.
Download button
Or you can choose File> Import Video to from Internet to begin downloading videos.
Burn Google Videos to DVD
Thirdly, paste the link in the program

Download Google Videos
After you have downloaded the Google Videos, all of them will be displayed on the middle panel with their detailed information, including duration, format and size, etc.

Step 2 : Choose Burning to DVD output profile.
Please unfold Output Profile, choose Burning to DVD from the list, and then choose DVD video NTSC Movie or DVD video PAL Movie according to your TV system.
Choose output formats

Step 3 : Click Convert button to start encoding Google Videos.
Once everything is ready, you can click on Convert to start the exporting process. If you would like to cancel encoding, please just click the Stop button and click Yes in the pop-up window then the encoding will be stopped.

Step 4 : Choose DVD Menu.
You will be prompted to choose DVD Menu when the program finishes Google video conversion process.
DVD Menu
--In DVD Menu Tile, you can name your DVD and input it into the box directly.
--In Background Music, you can browse music file from your local computer for your DVD.
--In Background Image, you can change your DVD's background image by click Browse Image File to select your desired image from your computer.
--In Menu Navigator, you can choose the playback mode for your DVD.
After you have made sure the settings, please click Next>> to follow the next step.

Step 5 : Insert DVD and start burning Google video to DVD
In DVD Configuration, you can see the following pop-up window;
DVD configuration
The program supports burning video to CD-R, CD-RW, DVD-RAM, DVD+R, DVD+RW, DVD+R Dual Layer, DVD-R, DVD-RW, DVD-R Dual Layer, random access writes, Blu-ray media, Blu-ray Rewritable media.
Insert a DVD media to the DVD burner, select recorder from the drop-down list, enter your desired Disc Lable, and then click Burn button, then the program will begin to burn video to DVD.
Note: If the inserted disc is not empty, you will be prompted to erase the disc. Click Yes, all data on the disc will be overwritten!
DVD burning engine
You can see the progress of burning Google video to disc:
Burn DVD status
After the program finish to burn Google video to DVD, it will pop up a DVD Burning Engine to congratulate you that your disc has been successfully burned.
Click OK button, the drive automatically ejects the disc.
Burn Google Videos to DVD successfully
Now your Google video have been burned successfully to DVD/Blu-ray disc, just have fun!

If you want to learn more information about this program, you can view the following website:
http://www.any-video-converter.com/

Thursday, November 18, 2010

How to Burn YouTube Videos to DVD/Blu-ray disc

YouTube is a video-sharing website on which users can upload, share, and view videos. As one of the most popular video sharing website, YouTube grants thousands of, perhaps millions of users to upload, share and video videos, and of course registered users are also be allowed to download their favorite videos. But how to save the funing YouTube videos as DVD or blu-ray disc?
Here Any Video Converter and Any DVD Converter Professional feature a new characteristic: both of them can burn YouTube video to DVD with DVD Menu.
Here the following is a brief guide on how to burn YouTube video to DVD/Blu-ray disc.

Step 1 : Add/Download YouTube video to the program.
If you have downloaded the YouTube videos from the website and saved in your computer disc, you just need click Add Video button or go to menu File > Add Video Files to select your desired video clips from your hard drive. But if you do not download the YouTube videos, with Any Video/DVD Converter, you can download videos from Internet and then burn it to Blu-ray disc.
Firstly, you need click Online Video tab in the Options window to sign in your YouTube account. Then visit YouTube.com and right-click on the desired video to choose Copy Link Location (this is for Firefox users) or open the video and then copy the URL from the navigation bar (this is for IE users).
Secondly, choose File> Import Video to from Internet to begin downloading videos.
Burn YouTube videos to DVD
Thirdly, paste the link in the program

Download YouTube videos
After you have downloaded the YouTube videos, all of them will be displayed on the middle panel with their detailed information, including duration, format and size, etc.

Step 2 : Choose Burning to DVD output profile.
Please unfold Output Profile, choose Burning to DVD from the list, and then choose DVD video NTSC Movie or DVD video PAL Movie according to your TV system.
Choose output formats

Step 3 : Click Convert button to start encoding YouTube videos.
Once everything is ready, you can click on Convert to start the exporting process. If you would like to cancel encoding, please just click the Stop button and click Yes in the pop-up window then the encoding will be stopped.

Step 4 : Choose DVD Menu.
You will be prompted to choose DVD Menu when the program finishes YouTube video conversion process.
DVD Menu
--In DVD Menu Tile, you can name your DVD and input it into the box directly.
--In Background Music, you can browse music file from your local computer for your DVD.
--In Background Image, you can change your DVD's background image by click Browse Image File to select your desired image from your computer.
--In Menu Navigator, you can choose the playback mode for your DVD.
After you have made sure the settings, please click Next>> to follow the next step.

Step 5 : Insert DVD and start burning YouTube video to DVD
In DVD Configuration, you can see the following pop-up window;
DVD configuration
The program supports burning video to CD-R, CD-RW, DVD-RAM, DVD+R, DVD+RW, DVD+R Dual Layer, DVD-R, DVD-RW, DVD-R Dual Layer, random access writes, Blu-ray media, Blu-ray Rewritable media.
Insert a DVD media to the DVD burner, select recorder from the drop-down list, enter your desired Disc Lable, and then click Burn button, then the program will begin to burn video to DVD.
Note: If the inserted disc is not empty, you will be prompted to erase the disc. Click Yes, all data on the disc will be overwritten!
DVD burning engine
You can see the progress of burning YouTube video to disc:
Burn DVD status
After the program finish to burn YouTube video to DVD, it will pop up a DVD Burning Engine to congratulate you that your disc has been successfully burned.
Click OK button, the drive automatically ejects the disc.
Burn YouTube videos to DVD successfully
Now your YouTube video have been burned successfully to DVD/Blu-ray disc, just have fun!

Tuesday, November 16, 2010

How to Enable MP4 Streaming

One important thing about playing MP4 video file as progressive download is that the moov atom needs to be located at the beginning of the file, or else the entire file will have to be downloaded before it begins playing. The moov atom is a part of the file that holds index information for the whole file. Any Video /DVD Converter new version add Flatten and add faststart to mp4 file option to play back mp4 video in the stream way. With this function, the moov atom is located at the beginning of the file which can let the video begin playing before the entire video will to be downloaded.
Here the following is a brief guide on how to enable MP4 streaming.

Step 1 : Add video to the program.
Click Add Video button or go to menu File > Add Video Files to select your desired video clips from your hard drive. Press Ctrl or Shift to select more than one video at one time in file folder. Or go to menu File > Batch Add Video Files to add video clips from single or multiple folders.
After you add desired videos, all of them will be displayed on the middle panel with their detailed information, including duration, format and size, etc.
Add files

Step 2 : Choose MP4 output format.
Please unfold Output Profile, choose MP4 output format from the list, you can unfold Video Files, and then choose Customized MP4 Movie(*.mp4) or other mp4 format according to your needs.
mp4 format

Step 3 : Check Flatten and add faststart to mp4 file option.
Before you click Convert button, please check Flatten and add faststart to mp4 files under Options-->--Video, you can produce MP4 files to upload to online video-sharing website, and the video will be played right away before the entire video has been downloaded from the website. For MP4 FastStart fixes the files so they can be streamed. It adjusts the MP4's metadata to allow for Flash players to play them right away (Fast Start), while it is downloaded from the website.
mp4 streaming

Step 4 : Click Convert button to start encoding videos.
Start encoding videos
Once everything is ready, you can click on Convert to start the exporting process. If you would like to cancel encoding, please just click the Stop button and click Yes in the pop-up window then the encoding will be stopped.

Step 5 : Upload converted mp4 videos to the online video-sharing website
After you have finished convert the video, you can click Output Folder to find the converted videos. Now you can upload the converted mp4 videos to the online video-sharing websites. While the video has been uploaded to the website, the video can be played before the entire video will to be downloaded.

If you want to learn more about this program, please view the following website:http://www.avclabs.com/